Quantcast
Channel: Flightradar24 Forum
Viewing all 5745 articles
Browse latest View live

Raspberry Pi feed upload to fr24

$
0
0
Hi.
Hopefully the last question.
I have my raspberry pi working. It is attached via wifi. My dump1090 is working and according to the picture below it is uploading to FR24 (only using the small aerial till I can get a cable.) When I go to activate my receiver I cant see it but when I look at statistics it there to be seen. Is this maybe because FR cant see my IP address in the statistics page. If so how do I rectify this ?
T-EGHH4.png
Attached Images

No Destination for Condor/Thomas Cook

$
0
0
There are some live flights of Condor where the destination is always displayed as N/A. When you look into the aircraft history, you can see that there seems to be a problem with the different flight codes? Does anyone know what's causing this?

cfg.jpgatcc.jpg
Attached Images

LNA Issue

$
0
0
Hi all,
In order to improve my range, I bought this week a Low Noise Amplifier SPF5189Z.
It's a 5V amplifier and I connected it to pin n°2 and 14 of my GPIO raspberry pi. Pins n° 4 and 6 are dedicated to the Fan.
When I try this following configuration, I have no signal:
Antenna - 5m SMA Cable - LNA - SMA to MCX adapter - DVB T dongle - Raspberry Pi.
Without the LNA, everything is fine with 250 messages per second.
Do you have any idea of what may be the issue ?
Thanks.

I'm stumped- new Pi system

$
0
0
I was a Windows feeder up until May 8th. I picked up a Kano computer kit (Raspberry Pi 3 Model B, case, power supply, 16GB MicroSD card and keyboard) for $35 on clearance from Walmart.

Followed the instructions on the website. Downloaded and installed the Pi24 image on the card. Plugged in the USB ADSB dongle I have been using for the past 6 years, plugged in the ethernet cable to my router and powered up. Power appears to be on. Ethernet traffic lights on the router and the Pi suggest it is communicating fine. I checked my router and I can see the Pi at 192.168.254.11 on my local network.

Ignore this:
Only thing is in the instructions-

"4. You should see a solid red LED, a blinking green one and as well as green and yellow Ethernet LEDs."

The solid red, the green and yellow ethernet LEDs are all there, no blinking green one.

Actually, editing this to say that the blinking green one is there, it was on the side away from me and doesn't flash continuously...

I click the link on the instruction page and the next page comes up- "Activate new receiver".

There is no receiver listed.

I have no clues where to go from there. I have built my own PCs in the past and know how to force Windows to do my bidding, but Linux is a mystery to me, as is coding. I see people talk about SSH, but seriously it is all new to me.

Can someone give me some hints? That a borderline non-techie can follow? I'm no Luddite, I have a Pixel 3 phone and 3 different PCs as well as running an online business but I am lost here.

Thanks.

Edited: More info...

Dump 1090 working but no aircraft tracked list

Maximum range does not show on polar plot

$
0
0
Apparently today's maximum range was 307NMi.
The polar plot shows a max of 288 (south) all other directions are less.

any ideas?

Just purchased a plug and play system. Is this really all I will need to get rolling?

$
0
0
I understand basics, so it wont be talking over my head thats for sure. But I did invest in a system
This is a TURN KEY 'Plug and Play' system!

COMPLETE FlightAware System with best components includes:

Raspberry PI 3 Model B + ADS-B 1090MHz Band-pass PRO STICK USB + SMA Filter plus Car Antenna for FlightAware

I do understand I am not totally a plug and play issue, but will I need to do any other purchasing to run on my lap top system.
? Just a basic yes, you will need to purchase a blah blah blah answer is all I am looking or. Will what I am getting get me rolling?
I have a silver acct. already. Thanks
Sandhya

FR24 client on Pi and VRS on PC

$
0
0
Hello fellow feeders,

Since the FR24 windows client stopped, I've been looking for a way to continue to feed FR24 but without redoing my entire installation under w10 which works perfectly for several years.

I am progressing....
The FR24 client is now installed on the Pi (raspbian)
The Pi is in wifi, the PC on which Virtual Radar Server is installed is also in wifi.
During the installation of the FR24 client I gave the requested information (email address, lat/long of the receiver, IP address of the receiver etc...)
On the FR24 website my receiver is well "online" but 0 planes.....
by connecting from a PC to the FR24 client via http ip-du-pi:8754 I can modify the options but I can't get an aircraft.........
The pi is in fixed IP 192.168.0.11
The PC is in fixed IP 192.168.0.10
The dongle is DVB-T with RTL1090 on the PC of course, with more or less 100/150 aircraft's tracked

Any idea of wich option i should activate ?
AVR, BEAST, ect ...
Port 31001, 30003 other ?

Regards,
Capecod

iOS app custom alerts not reliable?

$
0
0
Hello,
added some custom alerts with selected plane models (A32, B74, ...) , altitude, and local area. (near by Frankfurt airport Germany) Yesterday all the new set up alerts worked fine, without any problems. Today, ... with no changes at all, it is not fine working. In the moment it seems to work as random, sometimes it works, sometimes not. I wanted reliable alerts, that been one reason I started a subscription, but with only random alerts this does not make any sense.
Any ideas how to get proper working alerts with iOS app? Plane finde is no alternative here as there is no special options when setting alerts.
Thanks!

Finally - success!!

$
0
0
After finally managing to get my rpi setup to work with pi24, I decided I also wanted to feed Flightaware. I found the setup fairly simple but I couldn’t get any planes. Sounds familiar?

So today I tried something else. I installed Piaware on a new sd card. After adding the folder SSH to the directory, SSH connected nicely.

Flightaware found me easily, but I had to modify my location by moving the pin.

Then I added the fr24feed software by using instructions from another post in the forum. When I could see the settings, I found that the default connection was AVR/tcp, which gave me nothing. A little searching and I changed to beast/TCP with host ip 127.0.0.1:30005 ..

I’m now happily feeding both FR24 and Flightaware.

For the help of fellow ex-windows feeders: How to set up your PI

$
0
0
As I struggled hard to set up a new feeder after the old feeder was shut down, I decided to try to help others by creating this step by step userguide. There is a lot of help out there, but I'm trying to put it all in one place. After some trying and failing, I beleive this is the easiest way to set up a new feed. I decided to take the 'Flightaware-route' as I found this to be the simplest way. As an added benefit you will get a free Enterprise account there.


I bought a Vilros Raspberry Pi 3 Kit with Clear Case and 2.5A Power Supply that I found on Amazon and used an old DVBT dongle and a 1090 window antenna I have had sitting around for a while.

Start by installing Piaware, Flightaware's image software. It also has the latest version of dump1090-fa. Log in or create a profile if you don't already have one. https://flightaware.com/

http://piaware.flightcdn.com/piaware...-3.7.1.img.zip

Unpack the file to a new folder on your computer.

Use Etcher or Win32Diskmanager to create the image on a mini-SDcard. I used Win32DiskManager and a 16gb as I found none smaller.

https://sourceforge.net/projects/win32diskimager/

If you use wifi, edit piaware-config.txt to include your SSD and password before you eject the card.

Add also a folder called SSH on the card if you plan to use SSH.

Eject the card and insert in your pi. Boot up and register the device with Flightaware. You may need to edit your location.

https://flightaware.com/adsb/piaware/claim

You should now have an active Enterprise account with Flightaware.

----

Install PuTTy to access your Pi

https://www.chiark.greenend.org.uk/~...ty/latest.html

Find your ip on your network (e.g. 192.168.1.25 (if wireless) and use it to open PuTTy. Log in with username pi and password flightaware. (It's recommended to change the password. Use command passwd and follow the prompts.)

Enter sudo raspi-config to go to the configuration menu. Select 7. Advanced options and 1. Expand File System. (recommended)

Finish and go back to the command prompt. Reboot - sudo reboot

You can now check Flightaware status sudo piaware-status and restart feed sudo systemctl restart piaware from the prompt.

For reference, see https://flightaware.com/adsb/piaware...ional#password

Make sure you are logged into Flightradar24.com with your user account.

To get FR24FEED software, enter sudo bash -c "$(wget -O - http://repo.feed.flightradar24.com/install_fr24_rpi.sh)"

You will be asked to enter your email address, antenna position, sharing key (if you have one) and other details.

You can also do it manually step by step using the instructions here:

https://forum.flightradar24.com/thre...6479#post66479


You then probably need to add

1. Open config file using: sudo nano /etc/fr24feed.ini
2. Add these two parameters there.
use-http=yes
http-timeout=10

3. Save and exit: ctrl+o AND ctrl+x
4. Reboot your PI: sudo reboot


You should now be able to enter 192.168.1.x:8754 (x being your local ip) in your browser and get the feeder status. You may or may not be online.


If not, click on settings and enter --net --gain -10 in your Process Arguments. Add also 127.0.0.1:30005 in your Host IP. Change receiver to ModeS Beast (TCP), save and reboot and you should be good to go.

Live Dump looks different in Chrome on Mac vs. PC

$
0
0
When I have my PI's IP address pulled up in my browser to see the Live Dump it is acting differently depending on which computer I am using.

When I click on a plane on my PC, on the right hand side, I get this:

Capture.jpg

There is a live link where I can find the flight on Planefinder or Flightstats, or FlightAware.

When I click on a plane on my Mac, a box pops up with the flight details but nothing on the right side like on my PC.

Screen Shot 2019-06-04 at 5.49.29 PM.png

Both computers are running Chrome and the same version.

Any ideas?
Attached Images

PI24: Replaced dump1090 v1.14 by pre-build package of dump1090 v1.15

$
0
0
This is how I replaced PI24's integral dump1090-mutability v1.14 by pre-compiled package of dump1090-mutability v1.15

Compiled .deb package of dump1090-mutability ver 1.15 dev from source code on my RPi/Raspbian Stretch
Uploaded compiled package to my github account.
Replace PI24's dump1090-mutability ver 1.14 by ver 1.15~dev pre-build package from my github account.

Used following steps:


Opened file install_dump1090.sh to modify
Code:

sudo nano /usr/lib/fr24/install_dump1090.sh
Commented-out three lines (red) for ver 1.14, and added 3 lines (green) for ver 1.15, as shown below
Code:

    # Download and install dump1090-mutability
#    wget -O /tmp/dump1090-mutability_1.14_armhf.deb https://github.com/mutability/dump1090/releases/download/v1.14/dump1090-mutability_1.14_armhf.deb
#    dpkg -i /tmp/dump1090-mutability_1.14_armhf.deb
#    rm -f /tmp/dump1090-mutability_1.14_armhf.deb


    wget -O /tmp/dump1090-mutability_1.15_dev_armhf.deb https://github.com/abcd567a/dump1090/releases/download/v1/dump1090-mutability_1.15_dev_armhf.deb
    dpkg -i /tmp/dump1090-mutability_1.15_dev_armhf.deb
    rm -f /tmp/dump1090-mutability_1.15_dev_armhf.deb


Purged ver 1.14
Code:

sudo dpkg --purge dump1090-mutability

Run modified file install_dump1090.sh to install ver 1.15
Code:

cd /usr/lib/fr24/

sudo ./install_dump1090.sh

sudo service lighttpd force-reload

sudo systemctl restart fr24feed

Checked
Code:

apt-cache policy dump1090-mutability
dump1090-mutability:
  Installed: 1.15~dev
  Candidate: 1.15~dev
  Version table:
 *** 1.15~dev 100
        100 /var/lib/dpkg/status

Code:

fr24feed-status
[ ok ] FR24 Feeder/Decoder Process: running.
[ ok ] FR24 Stats Timestamp: 2019-06-05 17:57:04.
[ ok ] FR24 Link: connected [UDP].
[ ok ] FR24 Radar: T-CYYZ50.
[ ok ] FR24 Tracked AC: 23.
[ ok ] Receiver: connected (7183 MSGS/0 SYNC).
[ ok ] FR24 MLAT: ok [UDP].
[ ok ] FR24 MLAT AC seen: 22.

Pi Status sceen on LAN?

$
0
0
How do you get the Pi status screen on another LAN device?

<PI IP ADDRESS> gives a lighttpd placeholder page.

I guess it's <PI IP ADDRESS>:nnnn, but what is the nnnn?


Thank you.

When a microADSB stick, isn't a microADSB stick!

$
0
0
As a new feeder, I struggled with setup because of this list:

Step 4.1 - Receiver selection (in order to run MLAT please use DVB-T stick with dump1090 utility bundled with fr24feed):

1 - DVBT Stick (USB)
-----------------------------------------------------
2 - SBS1/SBS1er (USB/Network)
3 - SBS3 (USB/Network)
4 - ModeS Beast (USB/Network)
5 - AVR Compatible (DVBT over network, etc)
6 - microADSB (USB/Network)
7 - SBSx via Basestation (localhost:30006)


As I was coming from a flight aware setup, I already have a microADSB USB device, so kept selecting option 6.

This is where I was going wrong.

The correct choice is option 1, even though it's an ADSB stick, and very definitely NOT a DVBT stick.

All very confusing to a new feeder, so perhaps this ought to be made clearer in the user guide.


Thank you.

2019 - PI24 QuickStart Guide

$
0
0
STEP-1: Download Necessary Software

1.1 - Download PI24 image (zip) on your Desktop/Laptop


1.2 - Download and Install Win32DiskImager (Windows) OR Etcher (Win & Mac). Only one of these two softwares is enough. No need to download and install both.


STEP-2: Prepare microSD Card

2.1 - Insert microSD Card in your Desktop/Laptop’s card slot (or use a card reader plugged into USB Port).

2.2 - Unzip downloaded PI24 file to get .img file.

2.3 - Write the unzipped Pi24 image to microSD Card using Win32DiskImager or Etcher.


STEP-3 : Enable WiFi

If you want your Pi to connect to your router using WiFi (instead of a wired connection) right from first boot, enable Wifi as follows:

3.1 - After image is written, and while the microSD Card is still in the Laptop/Desktop, open File Explorer (Windows) or Finder (Mac), and open the microSD card.

NOTE:
If you have used Etcher, it will automatically eject the microSD card after writing the image.
Physically remove the microSD card or USB adapter and plug it back into the computer before you carry-out steps below.


3.2 - The microSD card will appear with name "boot" as shown in screenshot below.
PI24 - microSD in Windows - 1.png


3.3 - Open the drive named "boot". This will open the /boot folder of PI24. It will show some folders and files, as shown in screenshot below

PI24 - microSD in Windows - 2.png


3.4 - In PI24 "boot" folder create a new text file.

PI24 - microSD in Windows - 3.png

3.5 - Open the text file using Notepad (Windows) or TextEdit (Mac)
In the opened text file, copy-paste following text:

Code:

country=CA
ctrl_interface=DIR=/var/run/wpa_supplicant GROUP=netdev
update_config=1

network={
    ssid="YOUR_SSID"
    psk="YOUR_PASSWORD"
}

Replace:
  • CA by two letter code for your country e.g. GB for UK, US for USA, DE for Germany, FR for France, SE for Sweden, CH for Switzerland, NL for Netherland, AU for Australia, NZ for New Zealand, etc etc. (click here for complete list)

  • YOUR_SSID by your router’s wifi ssid

  • YOUR_PASSWORD by your router’s wifi password.

3.6 - Save file.

3.7 - Change the name of file from "New Text Document.txt" to "wpa_supplicant.conf"

NOTE: If your Desktop/Laptop does not show file extensions, the newly created file "New Text Document" will NOT show .txt extension at the end, as shown in screenshot below.

PI24 - microSD in Windows - 3.png

In the case of hidden extension .txt, even after you change file name to "wpa_supplicant.conf" its full name will be "wpa_supplicant.conf.txt" with ".txt" not visible. If the file has a hidden extension .txt, it will not enable wifi.

Configure Windows File Explorer to show file extensions as shown in the screenshots below:

PI24 - microSD in Windows - 4.png


Now change the name of file "New Text Document.txt to "wpa_supplicant.conf", as shown in screenshot below:

PI24 - microSD in Windows - 5.png


STEP-4: First Boot of RPI
Eject & remove microSD card from card reader, insert into RPi, power up the RPi.


STEP-5: ACTIVATION

IMPORTANT:
Both the RPi and your computer (from which you visit the activate page) should be on same Local Network (router) when activating.

Go to activate page linked below, and follow instruction to activate your Feeder Station.

https://www.flightradar24.com/activate-raspberry-pi

STEP-6: Checks

NOTE:
At the time of conduction following checks, both the RPi and your computer (from whose browser you are checking) should be on same Local Network (router).

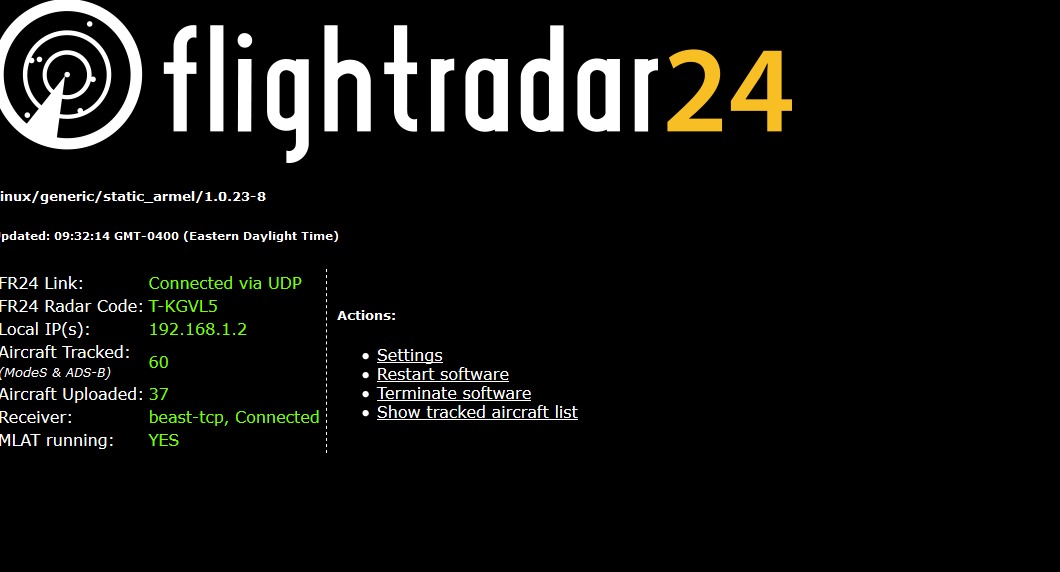
6.1 - To check that feeder is working OK, open your browser and type following address and press Enter Key.

IP-of-Pi:8754

The IP-of-Pi will be something like 192.168.0.21 and can be found from your router.

6.2 - To check that dump1090 is working OK, open your browser and type following address and press Enter Key.

IP-of-Pi/dump1090/

The IP-of-Pi will be something like 192.168.0.21 and can be found from your router.


STEP-7 (Optional): Control of RPi from Desktop/Laptop
Accessing your Pi from Desktop/Laptop using SSH

7.1 - For Windows:
Install PuTTY on your Windows computer to SSH to RPi
https://www.putty.org/

7.2 - For Mac:
Use Mac's Terminal to SSH to RPi

No results on Pi, Mac works fine

$
0
0
Hey there,

I´m new to the whole topic ADS-B and don´t get any positive results with my DVB-T Stick on my Raspberry-Pi.

Mac
OS: Mojave 10.14.5
Stick: NooElec TV28T v2
ioreg on mac: "RTL2838UHIDIR"
Output of rtl_test:
Quote:

Found 1 device(s):
0: Realtek, RTL2838UHIDIR, SN: 00000001

Using device 0: Generic RTL2832U OEM
Found Rafael Micro R820T tuner
Supported gain values (29): 0.0 0.9 1.4 2.7 3.7 7.7 8.7 12.5 14.4 15.7 16.6 19.7 20.7 22.9 25.4 28.0 29.7 32.8 33.8 36.4 37.2 38.6 40.2 42.1 43.4 43.9 44.5 48.0 49.6
[R82XX] PLL not locked!
Sampling at 2048000 S/s.

Info: This tool will continuously read from the device, and report if
samples get lost. If you observe no further output, everything is fine.

Reading samples in async mode...
Output of dump1090 --interactive --net:
Quote:

Hex Flight Altitude Speed Lat Lon Track Messages Seen .
--------------------------------------------------------------------------------
3c0acb 22450 408 51.092 13.873 310 86 1 sec
4b8de5 CAI5MY 36000 427 51.318 12.930 293 254 0 sec
3950cf 38000 419 0.000 0.000 245 3 3 sec
4068b6 TCX362 35000 467 51.113 13.476 129 205 0 sec
If I configure FR24FeedOSX to use AVR-TCP, it all works fine and the data gets submitted to flightradar24.com.

But I can`t get it to work on my Pi!

Pi
OS: Pi24 from latest Image
Stick: same
lsusb on pi: "Bus 001 Device 007: ID 0bda:2838 Realtek Semiconductor Corp. RTL2838 DVB-T"
Output of rtl_test:
Quote:

Found 1 device(s):
0: Realtek, RTL2838UHIDIR, SN: 00000001

Using device 0: Generic RTL2832U OEM
Detached kernel driver
.
.
.
rtlsdr_demod_read_reg failed with -4
rtlsdr_read_reg failed with -4
rtlsdr_write_reg failed with -4
.
.
.
No supported tuner found
rtlsdr_demod_write_reg failed with -4
.
.
.
Enabled direct sampling mode, input 1
rtlsdr_demod_write_reg failed with -4
rtlsdr_demod_read_reg failed with -4
.
.
.
Supported gain values (1): 0.0
rtlsdr_demod_write_reg failed with -4
rtlsdr_demod_read_reg failed with -4
.
.
.
WARNING: Failed to set sample rate.
rtlsdr_demod_write_reg failed with -4
rtlsdr_demod_read_reg failed with -4
rtlsdr_write_reg failed with -4

Info: This tool will continuously read from the device, and report if
samples get lost. If you observe no further output, everything is fine.

Reading samples in async mode...
Failed to submit transfer 0!

Library error -5, exiting...
rtlsdr_write_reg failed with -4
Reattaching kernel driver failed!
Output of dump1090-mutability is empty.

I`m no expert, but it seems, that the driver for the stick is not set correctly.

Can anyone tell me what to do?


Thank you!

Dakotas over Duxford event for the 75th Anniversary D Day many good videos to enjoy

$
0
0
hi all on fighter control forum,
i made last min decision to go to Duxford on Tuesday 4th June for their Daks over Duxford event for the 75th Anniversary D Day Operation Neptune WW2 Normandy
it was overcast & rained/drizzled most of the afternoon so no parachute drop took place but i did get some cool footage , one of the many cool videos I got is this 6 ship Dakota formation https://www.youtube.com/watch?v=ziyOo7knSik

it was a pleasure to see so many rare important planes together as very few veterans that took part in D-Day are still alive now https://en.wikipedia.org/wiki/Normandy_landings

many other videos I took will now be on https://www.youtube.com/user/AwesomeFullHDvideos/videos they include spitfire, dragon rapide, p-51 mustang, p-47 thunderbolt, Harvard, s, Auster, grasshopper, etc

Dave

Newbie data contributor on Pi24, couple questions

$
0
0
Hello All -

I have a RaspberryPi 3b with the Pi24 image installed. I'm very new to doing this but very enthusiastic.

While my receiver is working and submitting data I've discovered that unfortunately, in my enthusiasm, I set up my Pi24 before locating the Quick Start Guide. Having read that now I realize I've answered a couple questions incorrectly such as the receiver type selection, if I'd like to enable RAW data feed, and if I'd like to enable Basestation data feed. Also, I also made the mistake of running the script that suggested after the activation page malfunctioned. The quick start guide says that I should not have done this.

So... to fix this, should I format the SD card and start fresh or can I fix this by rerunning the fr24feed --signup command?

Thank you!

Very Dim Newbie v What Am I Seeing

$
0
0
Hi all,

I am extremely new to all this FR24 stuff (actually < 24hrs) and I am pretty clueless as far as Raspberry Pi and related things are concerned. I don't even know what a 'sudo' is, so you have to assume pond life if you are kind enough to answer my question.

I bought a Raspberry Pi 3B+. I loaded NOOBS and then the Raspbian software and actually got the whole thing to work, with it being plugged into my TV via HDMI. I had seen SSH mentioned before I did any of this and, after Googling what SSH was, I enabled it on my Pi. Good so far...ish :)

Next I followed the instructions on the FR24 website for downloading Pi24 and 'flashing' it to the SD card using Etcher. When I put the card back into the Pi and re-booted the FR24 screen came up but it didn't see my ADSB dongle. I have the Flight Aware Pro plugged into the Raspberry Pi. Somehow (a LOT more luck than judgement) I managed to SSH into my Raspberry Pi and typed the code as instructed on the FR24 page. That worked and I filled in all the necessary data and, long story short, actually managed to get all up and running.

I've been awarded a business account and if I go into the data it shows that I've seen some aircraft and their ranges. The weather here is pretty horrible at the moment (south of Perth in Western Australia) so I'm not going to see and light aircraft etc for the next few days but I believe my set up has seen some of the traffic for Perth and yesterday evening I am told it saw an aircraft at 168nm ;)

The reason I say all of this because I think all my stuff is working okay. The Pi, dongle etc are now in a cupboard upstairs in my house and not connected to a TV but the Pi is plugged into an ethernet port.

So, the two questions I have that you gurus may be able to answer (please remember that I do not know my arse from my elbow when talking about Raspberry Pis etc and need extremely simple instructions......imagine I am 3 years old, please):

1. Is there a way of seeing if I am actually sending data to FR24? I know I've seen some aircraft but I just don't know if the positions have been fed to FR24.

2. What I would really like to do is install an app on either my MacBook Pro or our home iMac and see the aircraft I'm actually seeing displayed on a sort of radar display. I think this is the sort of thing you see on Dump1090 but, as I have explained, I am absolutely clueless on how I might go about installing that. Hopefully it'll be possible without me having to take the Pi out of its location etc and it's working and I don't want to muck that up if I can help it.

I do know what the IP address of the Raspberry Pi is and I can get the FR24 screen using the IP address:8754 instruction. I know; I'm over-qualified, right :D

Thank you for any help and advice you may be able to give me and for taking the time to put in idiot language for me.

Cheers,

Paul
Viewing all 5745 articles
Browse latest View live


<script src="https://jsc.adskeeper.com/r/s/rssing.com.1596347.js" async> </script>